
Get ready to step into our kitchen renovation saga that I forgot to post months ago🙃. I’m about to give all the fun details of how I gave our kitchen some much-needed updates without breaking the bank.
So, let’s get started! First of all, this is not so much as a “renovation” as it really is just some rearranging and cosmetic updates. I would love nothing more than a full renovation, but for now we are working with what we’ve got!
And here is what we’re working with…
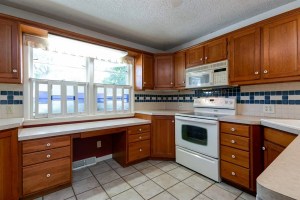
When we started, the countertops were stained 25+ year old laminate, the cabinets were that orange-toned wood, and the tile floor was cracked and tired. There were a couple of things I did like such as the stained-glass window accents and even the backsplash had its moments, but overall the space just wasn’t working for me.
The first big change we made was taking down the old upper cabinets on the oven wall. We didn’t get rid of them completely, so stay tuned for where they ended up later.
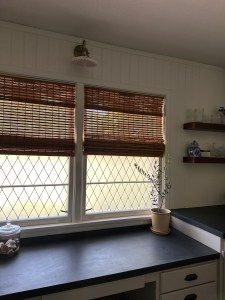
Instead of filling the whole kitchen with uppers and making it feel even tighter, we went for a cozier vibe. We added open shelving on one wall and left other spots empty, planning to add a range hood later on. Since this kitchen is tiny and we’re working with a pretty tight budget, the goal was to make it feel as open as possible until we can swing a full remodel.
Kitchen Backsplash Updates
Next up was the backsplash. We (and by “we” I mean me… because does my husband really care? No, he doesn’t. He gives me complete creative freedom, and I love him all-the-more for it.) decided on a classic white tongue and groove because it keeps things bright and clean while still adding some texture, so it doesn’t feel flat. And honestly… it’s super DIY friendly. I grabbed the boards at Home Depot and the best part… you don’t even need a table saw to cut them. They’re PVC, which means they’re moisture and mold resistant, and you can literally score and snap them with a box cutter. I used my miter saw for most of the cuts because I already had it, but I did end up using a straight edge and box cutter for the long corner cuts. Overall, this stuff was really easy to work with, and I’d use it again in a heartbeat.

(Note: some links in this post are affiliate links, which means I may earn a small commission if you purchase through them. It cost you nothing, just helps keep this blog running. So thank you for the support!)

My favorite brad nailer: HERE, cordless, lightweight, and easy to use!
I will say this… the panels dent really easily, so you have to be a little careful when cutting and putting them up. The directions call for glue-on only, but I used both a brad nailer and Liquid Nails to make sure they stayed put. Once everything was in place, I did one coat of primer and two coats of semi-gloss paint. So far, they’re holding up great. There are a few little dings here and there, but honestly, you don’t notice them unless you’re really looking. And with the semi-gloss finish on the paint, clean-up has been super easy.
Link to panels: Everbilt 1/4 in. D x 7-1/4 in. W x 36 in. L Glue-On Tongue and Groove White PVC Wainscoting Panel (6-Pack) PMAX3011P – The Home Depot
I went back and forth with the paint color for a bit. I love the look of tone on tone, but when I had the backsplash painted to match the cabinets, it just didn’t look right to me.

So, I went back in with the warm white to match our trim and it just clicked! Against those crisp white walls, the dark stain color of the open shelving really pops.
Backsplash Paint Color: Sherwin Williams – Greek Villa
![]()
If you look back at the before photos, you’ll see half our outlets and switches were beige… and it drove me crazy. One of my favorite little DIY hacks for this is swapping the covers. I ordered outlet covers from TayMac on Amazon, and they’re so easy to install. No need to mess with any actual electrical work, which is a win in my book. I’ve used these throughout our basement because I just couldn’t deal with those brown outlets anymore. They even make paintable options if you want to really hide them, which makes life so much easier.
2-Gang Outlet: LINK
Light Switch Cover: LINK
Paintable Cover: LINK
Kitchen Cabinet Updates
And then… the lower cabinets. This was another paint color saga (shocking, I know). I started with Farrow & Ball’s Pigeon, color matched by Benjamin Moore, which is one of my all-time favorites. Now, I seriously love that color, but in this space it just wasn’t working. I let it sit for a few weeks, hoping it would grow on me, but every morning it pulled this weird baby blue and that was not the look I was going for in this room.
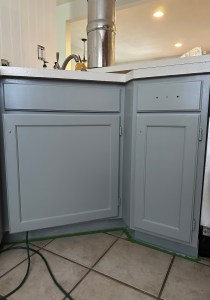
In the end, I switched to Benjamin Moore’s Revere Pewter and I love it. It’s a classic cool-toned beige that just works with everything, especially the black and wood accents in here. I also ditched the old ceramic knobs, which were basically cemented on with 40 years of stove grease, and swapped them out for black knobs on the doors and cup pulls on the drawers. The difference is huge.
Cup Pulls: LINK
Knobs: LINK
![]()
After:

In the end, it’s not perfect – but I do feel happier when I look at it. I really hope you took something away from this blog post and I hope my journey inspires you to tackle your own kitchen makeover!
If you have used some of these products or know of alternative options let me know in the comments! We’re all out here trying to figure this out together. <3
Want to see how I updated the flooring? Check out this blog post HERE.
In the meantime, you can read more of my blog posts HERE. Thanks for hanging out with me today!